
The goals articulation process, from patterns to details
So far in our course we have talked about a lot of big-picture stuff, learned to recognize patterns, and begun to create a container for our ideas. In this class, our focus is on you, the designer, on the stakeholders around you, and on setting tangible goals for your design project that will help to establish a clear working process while also allowing space for changes and flexibility over time.
In this video, Heather Jo Flores explains a 4-step process to help you move from big, vague dreams into a tangible, actionable plan.
Step 1: Stakeholder Interviews
What’s a “stakeholder”?
Stakeholders are the living creatures, human and non-human involved in the project, either directly or indirectly.
Right now your design project for this course is your own, focused on your own needs and desires. So it’s with yourself, first, that you need to conduct a stakeholder interview! And for the non-human species, you will need to rely on research and observation to conduct their “interviews.”
But soon, you will also need to have a conversation with your housemates, family, neighbors, and anyone else who will be affected by your design.
Ecological design should be site-specific, about designing for a particular place, for particular people, with particular needs and resources. The techniques and strategies are not meant to be universally applicable, or as a template, and the path to designing from patterns to details, but understanding what everyone needs, wants, and can accomplish, is a path of inquiry.
Your Stakeholder/Client Interview Questionnaire
Here is an example stakeholder interview questionnaire, from Jude Hobbs (she was Heather Jo Flores’ first teacher):
Your assignment is to check it out, read through the questions, and then develop your own, based on the questions you feel are most important to ask your stakeholders, about your site. Interview yourself first, then interview the other stakeholders.
This part of the process lays the groundwork for everything else, so please don’t rush through it! You might want to skip ahead to Observation and Boundaries, then spiral between these first three steps for quite a while before moving on.
Check out this graphic about the Art of Asking Questions.

Step 2: Write Your Design Thesis
In our Google Slides design template, you will find a section asking for your design thesis. Some might call this a “vision statement,” but we like the tangibility of the word “thesis.” It implies a scientific approach, based on action, logic, and data.
Write a few sentences describing the core purpose of this design. Think about the results you want to accomplish. Start with which problems you want to solve, and evolve toward the beautiful things you want to manifest. From there, shape it into a 3-4 sentence “design thesis” for your project.
What is this project really about? Why are you doing it?
What are you trying to get/experience/achieve/contribute/change?
This time, instead of focusing on the what, now focus on the why. Focus on the overarching purpose.
(Don’t get into the specifics of how just yet! This is not about methods. That will come later. Think overarching, big picture statement.)
Read your mission and vision back to yourself, out loud. How does it feel? It should feel good, and right. Your writing needn’t be perfect, but the statement needs to be true. Just a first draft is fine for now. Get there, and set it aside. You can revise it later when you’re finishing up—it will be even more clear by then!
In case it helps, here’s a whole-system visioning meditation. Go outside to a nice spot, put your headphones in, close your eyes, and enjoy:

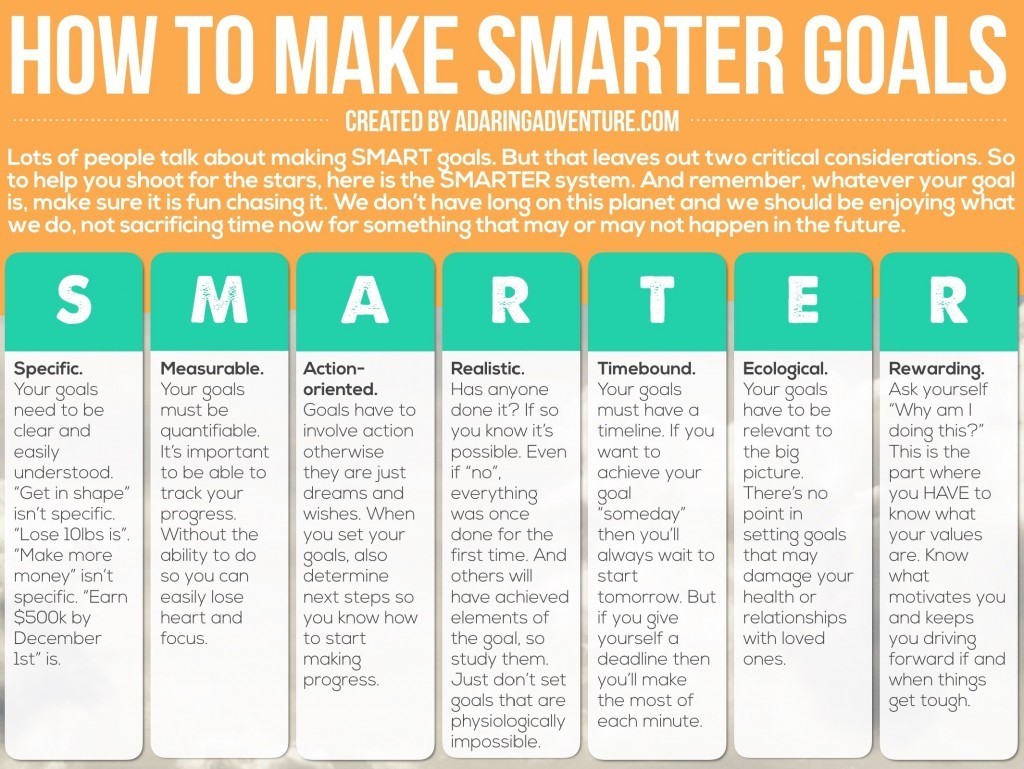
Step 3: Get S.M.A.R.T.E.R.
Once you’ve got your big fancy vision it’s time to bring it all down to Earth, and to distill all of this brainstorming and visioning into a handful of simple, concrete goals that you can use to anchor your design to the real world.
How? You can start by choosing the most important goals from your brainstorm above, summarizing them into statements you’d feel comfortable sharing with others, and then and making those statements S.M.A.R.T.E.R.
S.M.A.R.T.E.R. stands for Specific, Measurable, Achievable, Relevant, Time-bound, Ecological, and Rewarding.
- Specific: describe the details.
- Measurable: dates, numbers, sizes, limits.
- Achievable/Action-Oriented: this means you are willing and able to do the deeds needed.
- Relevant: needed and wanted by our community.
- Timebound: when will it begin, what will be the milestones, and when will it end?
- Ecological: our prime directive.
- Rewarding: because we need to obtain a yield, or the system doesn’t work.

Brainstorm a list of milestones and tangible results that you see as being connected to your design thesis/vision statement. Refer back to your fantasy-lists of components and dive deep into the results of your Stakeholder interviews. Work through the SMARTER list for each one and come up with a clear, concise collection of goals. 3 or 7 of them is plenty. Set them aside and move on.
Step 4: Establish feedback loops
Remember the principle, “the designer limits the yield”? This comes into play in every aspect of our design, and can be especially relevant during this visioning/inquiry/goals phase of the process.
Be sure that you don’t know what you don’t know, and that SO MANY new ideas will come to you, almost every time you interact with the land. As ecological designers it is essential that we hold space for change.
Imagine a seed, sprouting into a tiny baby plant. Think of the metamorphosis of your goals, into the planned set of actions (aka your design project), which transforms your goals into tangible, edible reality. Every action you take has biological, socioeconomic, and emotional impacts and factors to consider.
What happens if you consider each of your goals in life, through this lens? Biological factors connect to Earth care; socioeconomic factors connect to people care, and emotional factors connect to how adeptly we can share fairly and care for the future.
Without getting too far away from the tangible, let it be said that the best way to catch and store the new needs and ideas of your site, as they emerge, will be to establish a way to capture feedback. This could be as simple as a garden journal, or as complex as conducting detailed and periodic interviews with all stakeholders—whatever makes sense for your site.

Homework for this phase of your design
An important note about this process: you might be feeling less than prepared to establish these goals right now, and that is totally fine. The linear nature of a learning journey presents challenges when we’re trying to learn about cyclical processes, so please feel free to skip ahead and circle back around.
At some point, however, you will want to focus on getting through the rest of the topical modules. We asked you to do the first 5 before starting in the design studio, and we strongly recommend you become fairly intimate with the rest of the modules before going much further than the next step in the design process.
Actions, deliverables, feedback:
Step 1: Create a stakeholder questionnaire, your version, and conduct Stakeholder interviews (can be documented as written, audio, or video recordings)
- Yourself
- Immediate family
- People living on site
- Bordering neighbors, if possible
Step 2: Write your design thesis statement. Remember it just needs to be a rough draft for now, but if you can refine it then that’s great too.
Step 3: Create a handful of S.M.A.R.T.E.R. goals.
Step 4: Create a system for collecting feedback and revisiting stakeholder concerns as the system changes and evolves.
P.S. Goals are hard! If you feel stumped right now, don’t worry, as you will surely re-assess your goals many times before the end of this process. As mentioned above, this step and the next two (boundaries and observation) are all sort of spiraled together, so jump forward then circle back.